Sunday, October 01, 2023

Formatting date and time in Rust

There are different ways of formatting date and time in Rust using external crates. But I prefer to use the chrono crate . In order to use the chrono crate ( or any external crate ), we first need to add it to our project. 

Adding an external crate 

1) Open a terminal in Visual Studio Code. 
2) Paste the line cargo add chrono ; and the chrono crate shall be added to your project

This can also be done by the command line.

1) Open a command prompt and navigate to the directory of your project.
2) Paste the line cargo add chrono ; and the chrono crate shall be added to your project

Importing the necessary structs

Depending on how you to like to use the chrono , we have to import the necessary  strutcs to our project.

use chrono::{DateTime,Local, Duration};

In the above use statement, we want to use the DateTime, Local and Duration structs.

If you want to use the UTC namespace instead of the Local, the reference shall be as below

use chrono::{DateTime,UTC, Duration};

The comma between DateTime, UTC and Duration means that we are importing all the three structs.

Formatting the date

let current_date: DateTime<Local> = chrono::Local::now();
let formatted_date = current_date.format("%Y-%m-%d").to_string();

In the first line ,I have assigned the Local date time to current date.
In the second line, I have formatted the date for Year, Month and Date. The formatting flags can be used according to your needs.

Monday, March 16, 2015

SQL Formatting and more with SQL Pretty Printer


Formatting SQL statements, for improving code readability, and maintainability when the SQL statement is changed , or when fields are added, is  one of the tedious job I need to do during development . 

SQL Server still does not have any formatting option -   to make the above statement look better . Hence,   I pasted team as it is ,  even knowing that  Stringbuilder would have done justice , and maintaining the SQL statement shall be a little difficult compare to the formatted statement.

Later, while searching for a quick solution to the above, I came across SQL Pretty Printer.  On using it, I found it an amazing tool, which has the following features.

Main Features
  • Formats SQL statements
  • Beautifies SQL statements, alomg with customizable templates.
  • Converts SQL to various language formats, C#, VB, HTML
  • Converts C#, VB, PHP code to SQL; I have only tested with C#, and have seen it working
  • SQL Re-factoring / Renaming of Tables and Columns .

The short video below  explains the functionalities of the software.


The software comes in three versions ; namely desktop , SQL Server Addin and Visual Studio Addin.

I have used the Desktop version, and found it very handy and useful tool, for formatting SQL statements and converting them to relevant programming language syntax.

My Wish List :

While SQL Pretty Printer does as promised, I have prepared a small wish list :
  • Conversion of SQL to parameterized queries.
  • Conversion of SQL to LINQ – converting old SQL statements shall help developers to use LINQ and its functionalties.

Tuesday, June 24, 2014

Visualize your goals with Goalscape


Setting goals in life is mandatory for all of us. Though, we can chalk out plans and work towards achieving them, we still don’t get the complete picture of how much we have covered or how much is still left to accomplish the goal. A goal tracker shall be a good solution; but a tracker which displays the progress visually would be the appropriate choice; and Goalscape does that perfectly.

Overview

Goalscape is best defined on its website, as visual goal management software; to develop and communicate the key elements of any complex project: overall structure, priorities and progress tracking. It’s an Adobe Air application; available for the desktop and the web ( Goalscape Connect).

Please see below, the goals and sub goals I have defined for a product. Goalscape's circular format reinforces the fact that resources (especially TIME) are limited: time spent for one goal can’t be spent anywhere else.

Using Goalscape

Goalscape Desktop


The tool has a very user friendly and intuitive interface. The primary goal is made up of sub goals and neighbours. While sub goals can be considered as a child node of the parent goal; neighbours are in the same level as other sub goals.
The picture below illustrates the use of the primary goal, subgoals and neighbours.

Primary Goal - “Product”
Sub Goal –“Vision”, “Pricing” , “Development”, “Support”, “Marketing” – they are also neighbours.


There are a several things to note in the picture. One can add notes, resources and tags to a particular goal. Sliders can be used to set the importance and progress. Resource management can also be done, by specifying Responsible, Start Date and End Date.

The sub goal “Need” has a grey arc, which depicts the progress of the respective goal.  Progress aggregates upwards into the parent and higher level goals (all the way to the Main Goal at the centre) in proportion to each subgoal's importance.


The size of each goal's slice indicates its importance (relative to its neighbours).   In the picture below, I have set different importance for the sub goals -  Need ( 31 % ), Identifying users ( 28 % ), Value ( 18 % ) , Crowdsourcing ( 9 % ), Product Continuity ( 14 % ). Since the goal slice of “Need” has the highest importance level, it is followed by the others.  All the sub goals are important, but imagine the plight of an excellent product, which is needed either by very few people or by none.


Filtering by Highlighting

The Highlight feature is a filtering option in Goalscape. Probably the word “highlight” is more appropriate in the Goalscape context, as the tool only filters out the goals matching the dates, resources and tags.


I have added the tag “stakeholders” and “users” to Need and Product Continuity; as a product shall cease to exist if both of them don’t want the product.  In the highlight bar, when I highlight both the tags, only “Need” and “Product Continuity” are being displayed in white, while the others which don’t have the tag are being greyed out.  The highlighting can also be done for dates and responsibilities.

Exporting and Importing

Goalscape also allows user to export their Goalscape’s to PNG, PDF , DOCX,  Mindjet Mindmaps and several other formats. I found the export feature for DOCX and PDF interesting, as a report of the complete goals, sub goals, importance and other goal related facts are generated. Please find the exported “Product Roadmap”  for your understanding.

The import feature, allow Microsoft Project XML and Mindjet mind maps to be imported to Goalscape. I find importing MS Project interesting, as Goalscape shall provide a visual representation, rather than the boring GANTT charts. I have not used the import feature, but I believe it shall work as expected.

Goalscape Connect

Goalscape Connect is the web version and useful for people / teams who want to collaborate the goals with their colleagues. Besides having all the features of the desktop version, it has the real time collaborative features like uploading Goalscape file, chat and sharing.


The Connect version has the following features:-

•  The online project is always the latest version.
•  All participants can access and update the same project at the same time
•  Project administrators can set access privileges for participants individually (View, Edit, Admin).
• Users working on a shared project can see who else is in it and what they are doing (with appropriate warnings about simultaneous updates to the same goal)
•  A central organisational model can be rolled out, for people in different geographies to build their own specific implementations:  and hence ideal for distributed teams and remote coaching.
•  Goal Chat: instant messaging on individual goals, with 'in line' attachments and email notification options.

My Wish List

I would like to see the following features in upcoming versions of Goalscape
        a)    Change the background colour of goal slices.
        b)    Set the font of the goal title in bold.
        c)    Would like to have a Justify option for the Notes section.

Now, it’s time for you, to try out Goalscape, and post your comments. If you feel you would like more features please let them know by filling up the online survey.

I believe you shall like it, as much as I do.

Sunday, April 27, 2014

Displaying the column names for MS Project in C#


Whilst, MSDN provides a very updated and informative developer reference for MS Office  suite in general; it seems to have missed out the same for MS Project .

I was recently developing a MS Project addin in C# using VSTO, and came across several challenges ; but I am happy to say I completed the addin in due time.

The following code displays the name of the columns in the currently open project .

   MSProject.Project activeProject  = Globals.ThisAddIn.Application.ActiveProject;
    MSProject.Table prjTable = prjTable.TaskTables[activeProject  .CurrentTable];

    for (int i = 1; i <= prjTable .TableFields.Count; i++)
    {
         MSProject.PjField field = objTable.TableFields[i].Field;
         string colName  = Globals.ThisAddIn.Application.FieldConstantToFieldName(field).ToString();
        MessageBox.Show(colName);

    }
         
    if (activeProject  != null)
    {
        Marshal.ReleaseComObject(activeProject  );
        objProject = null;
    }

    if (prjTable != null)
    {
       Marshal.ReleaseComObject(prjTable );
       prjTable = null;
    }


There are two other points that should be noticed in this post :-

a) Usage of for loop instead of foreach loop. According to OOM.NET: Part 2 - Outlook Item Leaks , foreach  loops causes a memory leak while for does not. I am following this principle for all the Office addins.

b) Usage of Marshal.ReleaseComObject - Its usage is mandatory as all the objects being dealt with are COM objects

.

Saturday, May 04, 2013

Analayze your code with Ndepend

Ndepend is a static code analyzer  for .NET projects. It performs analysis of the project codebase;  and provides metrics, graphs and reports ; all of which helps a developer to enhance the code quality. I would like to  thank Patrick , for developing it, and also for providing a licence to me.

Post code analysis, Ndepend provides several tools to better your code . 

1) Dependency Graph - As the name implies, the graph  displays the caller and the callee in the project. This is important as it provides a birds eye view , when the code base is large.

2) Queries and Rules explorer - This is an amazing tool , which displays areas where the code needs improvement. The explorer addresses several sections - architecture, design considerations, dead code etc . I am providing a snapshot below :-


Once a rule is selected ; the query and rules editor automatically creates a CQLinq syntax , executes the query and displays the result. Alliteratively , the developer can also write a query ( for those not covered by Ndepend ) and get respective results.

3) Metrics - The Metrics window displays the usage and relevance of the code being analyzed.  The developer can use the metrics, to view where are the methods being called directly or indirectly. Besides methods, developers can also view metrics of namespaces , fields  ; which come in very handy to understand calling sequences and workflow in large projects.

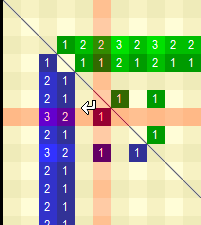
4) Dependency Matrix - The dependency matrix is a visual representation of the methods being used, and the methods using them . I am posting a screenshot below .


The following is the representation of the green and blue colour .

The Matrix Cell is Green because the method (in column) is used by the method (in row). 

The Matrix Cell is Blue because the method (in column) is using the method (in row). 

More features can be found here.  Overall I find it a great tool ; I shall update this post once I come across new features.